Showing posts with label Miniatures. Show all posts

06 February 2011

Pink Panthers, and a few Dropships

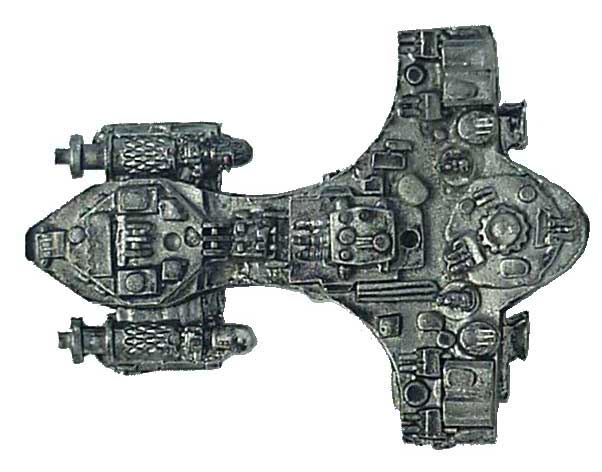
I have a couple of Galactic Knights Carnivorian Panther Class Cruisers that I'm try to finish up and get off my workbench. I've been meaning to post some pictures for a while, and a recent post at Super Galactic Dreadnought prompted me to action.
While I had my camera out, I also snapped some pictures of some AeroTech Union and Overlord class dropships that I have been wanting to show off. With a little help from Picassa, you can see these pictures in the embedded slideshow below, or you can see the full size images in my miniatures gallery.


For the Panthers I employed a non-standard method for painting these. It went something like this:
  1. Start with a black primer coat.
  2. Drybrush a dark grey, then gradually work up to lighter shades.
  3. Accidentally splatter with Pink Paint. Really dump it on.
  4. Wash off most of the pink paint, and spread the rest around a bit.
  5. Accent with magenta ink.
  6. Highlight with Metallic Inks, as shown here.
  7. Apply matte varnish.
  8. Apply a flat black glaze to "deep" areas to further knock down shininess and bring up the contrast.
  9. Add lettering in white ink for the ship names (in process).
  10. (next) Mount on Ninja Magic flight adapters?
Since these are "Panther" cruisers, I decided to name them after cats I have known. The first is "Telstar" after a big black cat we had when I was very young. The second is "Boris" after an even bigger black* Maine Coon who has assisted in the development of Squadron Strike (Boris allows Ken to type, sometimes). 

* Boris informs me he is actually a mackeral tabby.

The AeroTech dropships were an experiment in how much I could do with metallic inks, and I am very pleased with the result. I started with a black primer, and applied a number of thin layers of silver ink until I got a solid tone. Some highlighting with copper ink, black ink on the doors and some black-lining the details finished them off nicely. These came out with a much better metallic look than I get from metallic paints.
GBR Giant Battling Robots Favicon

28 November 2010

Wet Palette

I've been working on finishing up an Arctic Wolf mini. I took this picture of it (on the right) for a post back in September, and I've been using it to "brush up" my technique, since I'm a bit out of practice. This is not amazing.
I wasn't happy with the browns, so I broke out those colors again and got back to work on it. This also, is not amazing.


Here's a close-up. I started reworking this back in September, but took a long break because I've been busy. The Thanksgiving holiday has given me more free time, and since last week I've been painting again in what time I could manage in the evenings. Some progress has been made, but still not happy with it. And still not amazing.

A picture from few days later; I've got a better blend and a start at highlighting. I'm still working at the browns, and this work has been spread out in short spurts over 3-4 days.

But not amazing.


Since this work has been spread out over time, I've been storing my paints in my new wet palette I bought back in September. The paints in the round well-palette are the same batch that I started this work with back in September. That was about two-and-a-half months ago.

 AND THIS IS AMAZING


I don't get many long stretches of painting time these days, and being able to store my paints open and wet is incredibly useful. I also like to blend my colors, and even the blending spots I make outside of the wells are staying wet.

AMAZING!


To be fair, I haven't exactly left these paints unattended for over two months. Every few weeks I've opened them up and stirred-in a little airbrush medium to keep them wet. I also dosed the palette sponge with rubbing alcohol to help keep the paint from curing. The pigments do settle, and the airbrush medium I added made them very thin. I had to stir them throughly, and I added a little regular acrylic blending medium to get them back to a good consistency. I always work with thin paints anyway, so this didn't me a bit, but if you are used to working with paint straight out of the bottle this might not be to your liking.

This wet palette far exceeds my expectations for what it could do, and will change the way I paint. Now I should be able to pick up the previous colors I've been working without having to spend time remixing and getting the consistency to how I like it.


Bonus Pic: If you recall my little adventure with the pink paint, my might be amused to learn there is still a spot of pink on my living room furniture.

Happy Painting!
GBR Giant Battling Robots Favicon

04 October 2010

Battletech 4th Edition

I made a good find yesterday at Half-Price Books: The Battletech 4th Edition boxed set.


The box itself was a bit beaten up, and I already own a beaten-up 4th edition box minus the original contents.


One quick peek inside the box was enough to show me at the original rulebook was still there. That, and a very distinctive lump metal, shown just to the right. I still wasn't sure the $25 price was worth it, even for an out-of-print Atlas miniature, but what the heck.


Later, out in the parking lot, I broke the box open again to show my wife the Atlas, and found the Zeus mini too. THAT'S when I was sure I'd made a good buy.


The rest is icing on the cake. The box may have had some wear and tear, but all the components appear to be in perfect condition.


There is also a set of stickers (above, on the left) with the Inner Sphere House insignia that I didn't expect. (Also a nice Power Rangers pencil.)


This is my second stroke of luck with used FASA games. Needless to say, I am quite pleased.
GBR Giant Battling Robots Favicon

19 September 2010

Banner Day

I spent a few hours today pushing pixels around for my new banner - enough time that I figured it was worth a post in itself. Here it is ...


My new banner in all it's glory. 
It's not quite right yet - as you can see up top, some of the best bits are covered up by my title text. I'll see about fixing that later.

Yellow Jacket working image
All the parts of this image are on separate layers in Paint.Net so that sort of change won't be too hard to do. 


Here are the working images, and the original images (pretty sure I found the right ones).

A not-quite-final ...


Yellow Jacket original image


... and the original.


Guillotine original image


All the mini images were put through the "Ink Drawing" filter in PDN to give them a more stylized look.


A final layer below.
Two minis on one layer

Spider original image
 (photo by Sam "Wasp" Snell)


Spider working image


The original "Jumping Spider" photo was given a perspective rotation using GIMP. The original was too small without resizing, and this me stretch the top and shrink the bottom, getting the whole effect in the picture. The jump-jet splash looks a bit flattened those, maybe I can tweak that too.


Vindicator final image.


The Vindy is the only one where I couldn't find the original image. I obviously took the photo, and this mini does feature here, but I guess I never posted any other photos of it. I might have over-done the Ink Drawing tool here, and I need to clean up the edges, which look messy in the final banner.


Hex grid original image
I tried rotating some images of a hex grid, but I found a Hex Grid renderer for GIMP that worked better. I made a REALLY big grid, gave it a perspective rotation, then cropped out the over-stretched parts. GIMP is a good tool, and I'm glad this gave me a chance to start using it.

Random Walks
The random walks image is derived from the same spreadsheet I used for my Monopoly post way back when. This image is a just a screencap from Excel. The random walks were in my original banner too, but with the addition of the hex grid I cut down to just four lines, and made them heavier. Here is the old banner for comparison (below).


Dice Original image (photo by Maximaximax)
These dice are the only part of the banner I didn't create myself - Thank You WikiMedia! I might take a stab at photographing some of my own dice if I get ambitious, but these will do nicely for now.

Finally, thanks to Steve and PiP for prodding me in the comments to get this done. It good when friend bug you to do stuff. :-)

GBR Giant Battling Robots Favicon

02 July 2010

Range Testing for Little Wars

Over at Toy Soldiers Forever, Mannie is preparing to play one of the original miniatures rules wargames.
Last winter I acquired a reprint of H.G. Wells' Little Wars, that most original and elegant of wargaming tretises. First published in 1913, this very slim volume set an early standard for wargaming in which the obvious agenda is fun and the not-so-hidden agenda is the futility of war and the advantages of peace.

The clever prose and the droll attention to simplicity and pragmatism make this a delight to read.


Mannie clearly takes delight in testing his new toy cannon too. He's even done a very scientific study of projectile performance. I like it!

 I'm looking forward to the report on the full scale battle too, coming later this month.
[Image From Mannie Gentile: Toy Soldiers Forever]
GBR Giant Battling Robots Favicon

03 May 2010

Battletech Billboards

I picked up some terrain pieces from the Acheson Creations booth last year at ORIGINS (a few pics 1 2 3). Although they painted up well enough, they still didn't look right. They needed something more.

From Battletech Billboards

Because I always intended these to be barriers for a Solaris style arena, I thought it might be cool to turn them into billboards for various sponsors. All I needed were some ideas for sponsors, and I had this idea I've been wanting to try. I did some digging among the Battletech blogs I follow for banner or icon image, a little image editing in Paint.Net, and sent it to the color printer.

From Battletech Billboards

A bit more work with a good pair of scissors (the Perseus and Thug helped), and then some glue ...

From Battletech Billboards

 ... And viola!

From Battletech Billboards


Steve's Battletech Reader billboard was the most work (image editing, I replaced "Classic Battletech" with "The Battletech Reader") and turned out the least legible. So I might have to redo that one (Hey Steve, got any banner ideas?).


I was so happy with the results, I decided to turn it into a mini tutorial. I have a Picasa album up with the full set of Battletech billboard photos.

From Battletech Billboards

Lesson #1: Try some different sizes, and (if you can) print a black-and-white copy first to check the final size before going to the expensive ink. I did three sizes for the Catalyst Logo, and only the smallest would fit. The MechCorp logo was too big entirely and I'll need to rework it from scratch.


A dry fit to see how the finished piece will look is always a good idea.


Put a drop or two of glue on the back of the paper, right in the middle. A single drop will do for smaller bits, but with larger pieces it helps to put a small amount of glue near the corners.


Next is the part I couldn't take a picture of - place the paper on the piece as you did with the dry fit, then press down with your finger and slide the paper around to spread out the glue underneath the paper. This pushes out bubbles and excess glue, and should give the paper a good bond. The glue starts setting pretty quickly once you do this, and you will feel it getting harder to push around. Get it set where you want it and press down on the corners to make sure they stick. Wipe away any excess glue (I just used my finger). In the event you end up with a corner that isn't glued down, use your hobby knife to place a tiny amount of glue underneath and press it down again.


It was an easy project, and I've got some attractive new terrain pieces to show off. Follow the link if you want a copy of my billboard images (MS Word).
GBR Giant Battling Robots Favicon

14 February 2010

Pink Explosion

 I've been working on a pair of starship minis (Panther Class Cruisers from the Galactic Knights line). I hadn't done anything fancy; black primer, layers of metallic medium, black glaze, a little white drybrush, but I wasn't completely happy with it. They looked drab, and I thought it needed something more, some color maybe. I reached into my paint drawer and pulled out a bottle of Vallejo Sunset Red, which might be fairly described as very pink. A tiny bit of this stuff, I thought, should do the trick.I went to squeeze out a little bit into a bottle cap to work with, but the tip was plugged. No problem - I popped the tip off and used a sculpting pick to poke out the opening and stir up the partly cured paint that was blocking the hole. I added a few drops of rubbing alcohol to the bottle, pressed the tip back on, and gave it a good shake. (Rubbing alcohol is a solvent to acrylic paint, and I've has some luck rehabilitating old bottles of paint this way.)
Back to the painting - I went to squeeze out a bit of paint again, and the darn thing was still plugged up. I squeezed it harder and ...

   SPLAT!!!   

 ... the newly loosened tip came off, splattering bright pink paint all over my painting table, my minis, my clothes, my hands, and (I now see) even a bit on my computer keyboard and screen. What a mess! Reasoning that I needed to clean my hands off before I spread the mess, I dropped the minis into the water dish to keep the paint from curing and ran to the sink to clean myself up. Once that was completed, I put the minis under running water and scrubbed the pink off with a lightly stiff nylon brush. This was fairly successful, but the rough handling also took some paint off exposed corners of the minis, which will require some repairs. I am considering re-primering them white and painting them in pink, to commemorate the event [edit: See the results here].
GBR Giant Battling Robots Favicon

01 February 2010

Traveller Minis

Here's a welcome and some pictures for everyone visiting from the Star-ranger.com forums.

Some minis I just finished for use with Squadron Strike. These are highlighted with the metallic sliver ink I bought a few days ago. From these pictures it looks like I dipped them in it, but I really just hit a few spots for extra emphasis.


These are from the AdAstra Zhodani Fleet Box 1 set. I have them temporarily mounted on the bases that come with the box. And yes, I was playing with the effects. :-)


More Pics to tell about, but I must get to sleep. Click the final pic to link thru to my Picasa album where you can see all the pics.

Traveller Minis - Zhodani Fleet

- G'nite.


GBR Giant Battling Robots Favicon
Posted by Picasa